Guest post by our Google Summer of Code student, Manorit Chawdhry Project proposal: https://summerofcode.withgoogle.com/projects/#6209067233574912
Motivation
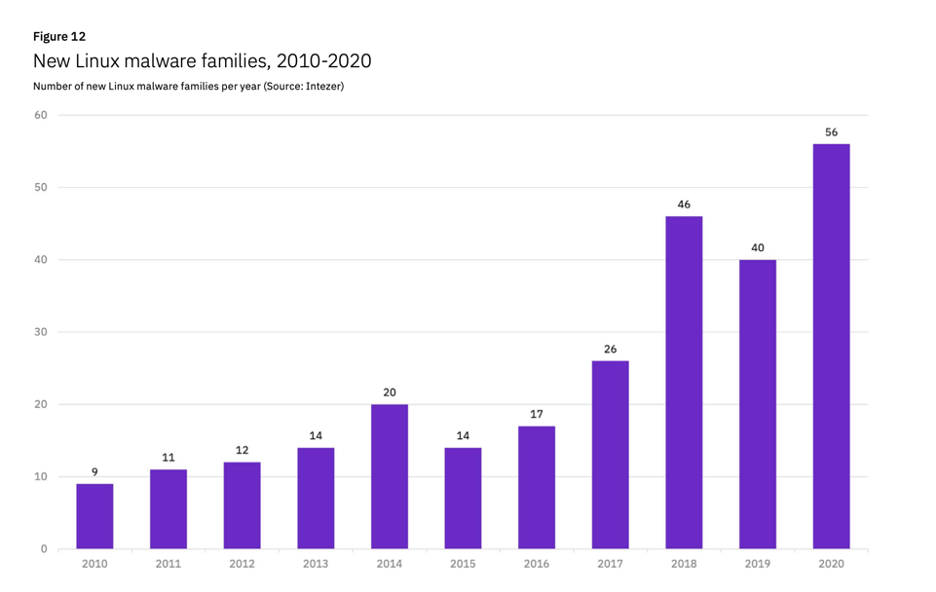
Wait, what? Malware on Linux? Yup, you read it right. Linux malware isn't given much importance in our community, as Windows is the most targeted operating system for malicious attacks. But that doesn't make Linux malware less important. Linux has around 90% of public cloud workloads and is widely used as a base for many operations. Even Windows is becoming compatible with the Linux kernel (WSL), making Linux a bigger target for malicious activities.
When it comes down to Linux malware, there is not a lot of support for stealthy malware analysis techniques. However, Drakvuf utilizes Virtual Machine Introspection (VMI) for gaining access to the VMs. VMI makes it a lot harder to detect by malware as there is no in-guest agent present. Drakvuf currently supports analyzing Linux malware, but there is no support for running it on a bigger scale – you'll have to manually copy the malware sample to the VM and execute it. The groundwork required was to implement a Linux injector that can inject shellcode and write and read files from the guest virtual machine. These methods allow the injector to inject malware samples onto the guest machine, execute it and retrieve all files dumped to disk by malware. Windows already has a stable injector in Drakvuf but the Linux counterpart relied on constant offsets inside the library that would change between compilations.
How the Linux injector was re-written
Initially, the Linux injector present in Drakvuf was similar to the Windows injector. It tried to use the dynamic libraries present inside the system to control the flow of the guest OS. Although it worked pretty great for the Windows injector, the Glibc interface of Linux wasn't a stable one and was prone to failure depending on different Glibc versions. We decided to use the syscall interface in the new approach, as syscall numbers are stable across kernel versions.
How it works
Let's quickly think about how to execute a sample from the hypervisor level. One of the first ideas would be to spawn a new process with target code. However, the hypervisor doesn't know how to create new processes in the guest operating system. So if we can't start a new process, the next best thing is to hijack an existing one and make it run our sample.
For injecting into any target process, we begin by setting a trap on the context switch. When it triggers, we check if we got the PID of our target process. If the PID matches, we set a breakpoint on the first instruction that the process will execute right after it returns to userspace.
Once the process starts running, it immediately triggers the trap. This causes vmexit, which gives control back to Drakvuf. Now, at this point, we can modify the target process from changing registers to changing the process memory. We utilize this to set up Linux system calls and execute them from inside the hijacked process. Once we are done, we restore the hijacked process state.
The challenges
The biggest challenge was that, we didn’t want to call library functions, unlike in Windows injector. Windows injector is used to call Windows API functions available in the virtual memory for injection. But since we were dealing with system calls, we could not just jump to a function mimicking the call instruction. We had to find a syscall instruction somewhere in the process's virtual memory and set the instruction pointer to point to it.
The initial thought was to modify the target process's current instruction and overwrite it with syscall instruction. Although this method seemed promising initially, it failed due to how Drakvuf handles shadow pages.
To circumvent this, we took a step back and tried to find a syscall instruction that already present in the process address space so that there is no need to write anything to process memory.
vDSO to the rescue
The vDSO (virtual dynamic shared object) is a small shared library. Without going into the technicalities of vDSO, it was created to minimize the overhead of context switches during system calls – a few of the common system calls like gettimeofday can be used just like a standard function. The main advantage of vDSO is that the kernel automatically maps it into all userspace applications, making it an excellent source for syscall instruction.
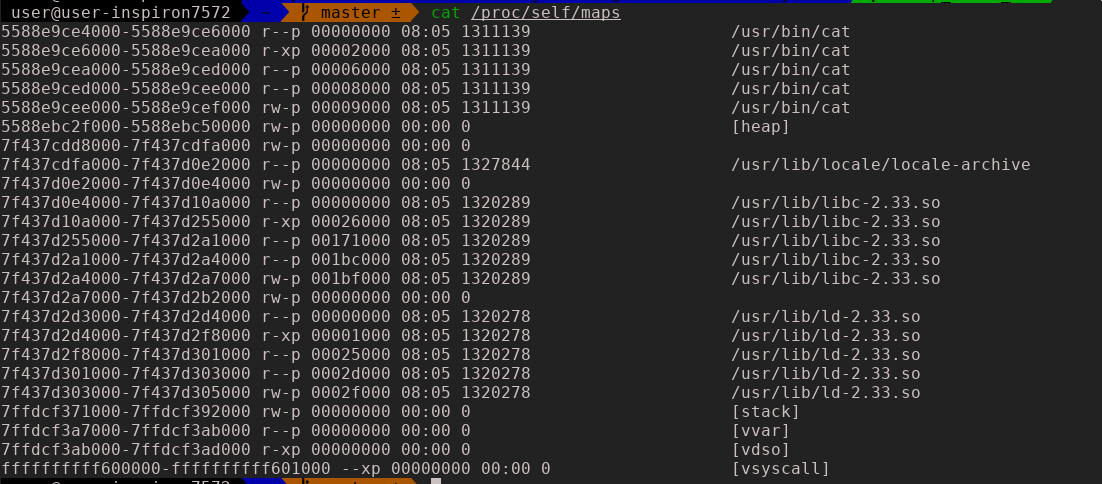
Before we can look for syscall instruction in vDSO, we first need to find the location of vDSO in our hijacked process. As per the vDSO man page
You must not assume the vDSO is mapped at any particular location in the user's memory map. The base address will usually be randomized at run time every time a new process > image is created (at execve(2) time). This is done for security reasons, to prevent "return-to-libc" attacks.
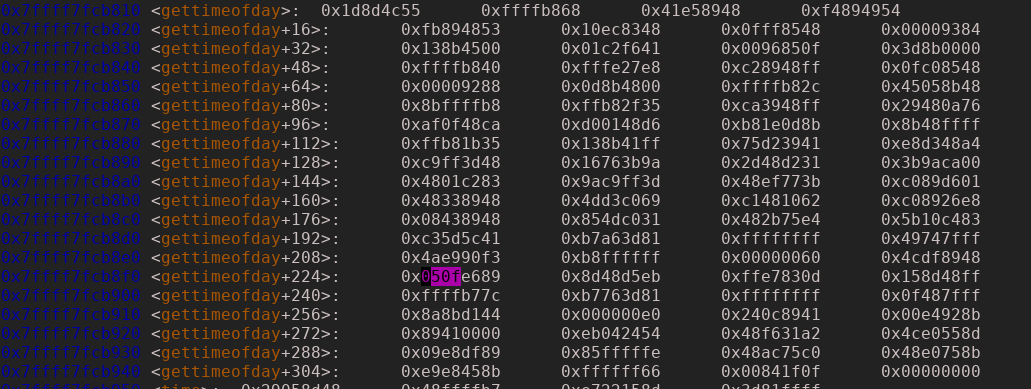
As a workaround to bypass randomization and create a stable solution, we parsed the kernel structure information (for inquisitive readers, the vDSO base address can be found in current()->mm.context.vdso).
Having the base address of vDSO, we were able to easily find the offset of syscall instruction inside the vDSO image and add a trap right after this instruction. Now, whenever we wanted to call syscall on behalf of a hijacked process, all we needed to do was to modify the process instruction pointer to point to the above syscall instruction.
Final results
There were a few methods implemented in the Linux injector throughout the GSoC period. The most important of them are write-file and read-file.
write-file method
This method copies files from the host to the guest VM. From an automated malware analysis perspective, it's mainly used to inject the malware sample onto the guest VM.
Brief working:
- Allocate virtual memory inside the hijacked process, so that we can use the memory as an exchange buffer (system call used:
mmap) - Create an empty file inside the guest VM (system call used:
open) - Copy content of a host file to the exchange buffer
- Write file content in chunks from the exchange buffer to a VM file (system call used:
write) - Close the file on the guest VM (system call used:
close) - Restore the registers of the hijacked process
- Stop the injector
read-file method
This method copies files from the guest VM to the host. It is especially useful when the malware works in multiple stages – for example, we can retrieve the downloaded file that malware saved on disk using this method.
Brief working
- Allocate virtual memory inside the hijacked process so that we can use the memory as an exchange buffer (system call used:
mmap) - Retrieve the file descriptor of the target file inside the guest VM (system call used:
open) - Read file content from VM to the exchange buffer in chunks (system call used:
read) - Copy the content from the exchange buffer to a new file on the host
- Restore the registers of the hijacked process
- Stop the injector
Summary
Implemented changes lay the groundwork for automated Linux malware analysis. After adding the missing exec-file method (similar to write-file and read-file), the Linux injector will be ready to use. All the code is available in the Drakvuf repository.
